 Save
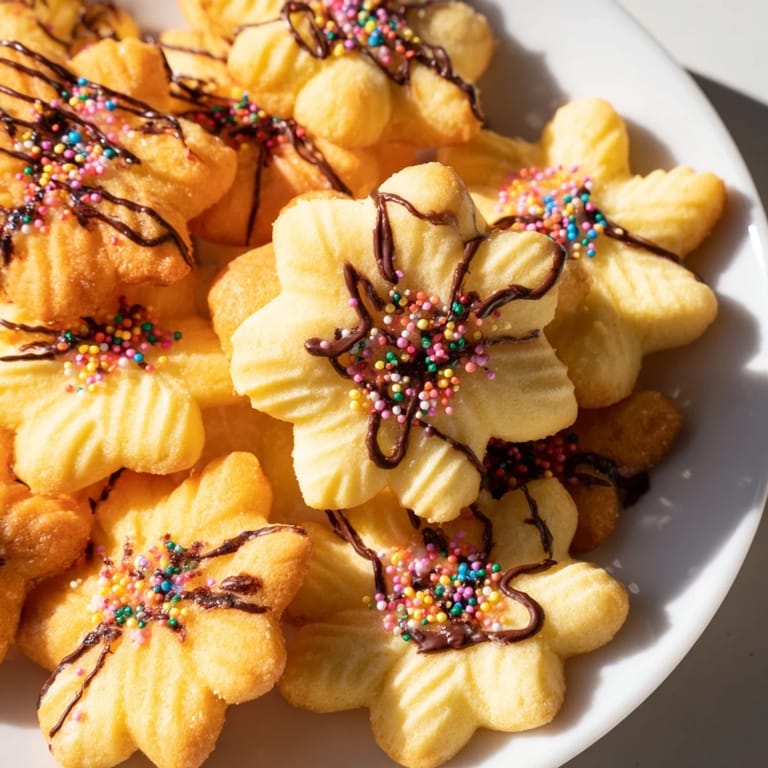
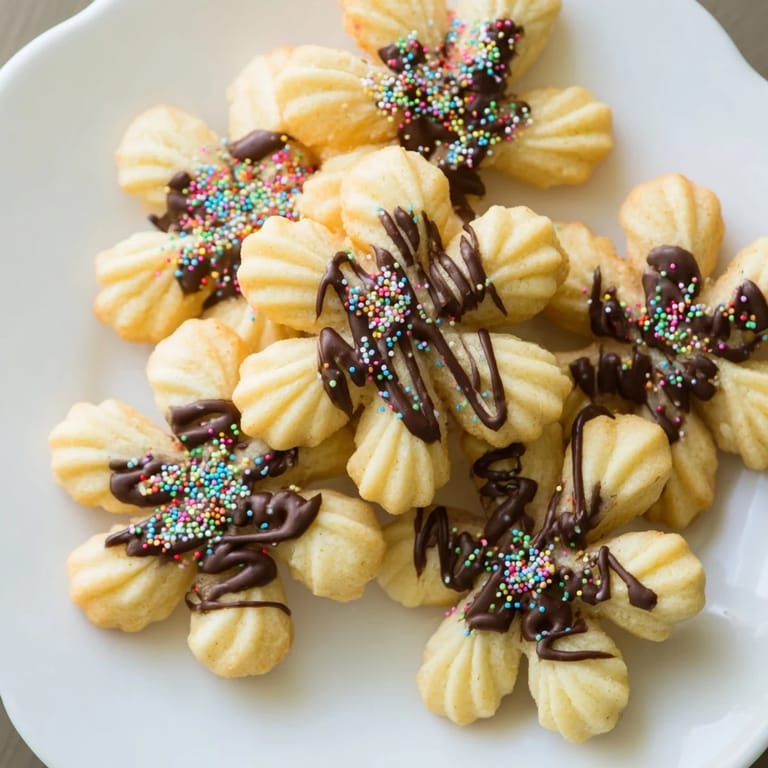
Save My grandmother kept her cookie press in a drawer wrapped in a faded kitchen towel, and I must have watched her use it a hundred times before I finally understood the magic—how soft dough transforms into delicate, perfect shapes with just a gentle squeeze. Spritz cookies were her signature at every gathering, and they disappeared faster than anything else on the table. I'd stand on a step stool beside her, mesmerized by the repetitive press-and-lift motion, the little cookies appearing like edible jewels across the pan. Now when I make them, I can almost hear her humming in the kitchen with me.
I remember bringing a tin of these to a potluck years ago, nervous because I'd made them with an extra tablespoon of butter on a whim. They came out impossibly tender, almost melting on your tongue, and someone actually asked for the recipe before tasting anything else on the table. That moment taught me that a tiny adjustment, made with confidence rather than panic, could turn a familiar recipe into something people actually remember.
Ingredients
- Unsalted butter (1 cup, softened): The foundation of everything—softness matters here because cold butter won't push through the press smoothly, so let it sit on the counter until it yields gently to your finger.
- Granulated sugar (3/4 cup): Sweetness without competition; this amount lets the delicate butter flavor shine through.
- Large egg (room temperature): Brings everything together as an emulsifier and binds the dough just enough to hold its pressed shape.
- Vanilla extract (2 teaspoons): The quiet backbone of flavor that makes people ask what's in these cookies.
- Almond extract (1/2 teaspoon, optional): A small addition that adds warmth and complexity; don't skip it if you enjoy that subtle nod to holiday nostalgia.
- All-purpose flour (2 1/4 cups): Keeps the texture tender and lets the buttery crumb be the star.
- Fine salt (1/2 teaspoon): Balances sweetness and deepens the buttery notes in every bite.
Tired of Takeout? 🥡
Get 10 meals you can make faster than delivery arrives. Seriously.
One email. No spam. Unsubscribe anytime.
Instructions
- Prepare your oven and pans:
- Heat your oven to 350°F while you line baking sheets with parchment paper—or if your sheets are trustworthy nonstick, you can skip the paper and save yourself a step. You want everything ready before you start pressing, since the dough prefers to go straight from pressing to baking.
- Cream butter and sugar:
- Beat them together for about 2 to 3 minutes until the mixture looks pale and fluffy, like clouds forming in a bowl. This aeration is what gives the cookies their signature delicate crumb, so take your time here and don't rush past the fluffy stage.
- Add egg and extracts:
- Drop in the egg and both extracts, beating until everything disappears into a smooth, glossy mixture. Stop and scrape down the bowl so no streaks of dry ingredients hide beneath the surface.
- Mix in flour and salt:
- Gently fold the flour and salt into the wet mixture, scraping down the sides as you go, until the dough comes together soft and smooth. This dough should feel almost like soft play dough—if it's stiff, you've mixed too long or something else has gone wrong.
- Press and shape:
- Fill your cookie press with dough following the manufacturer's instructions, then press cookies directly onto your prepared sheets about an inch apart. Work steadily; the dough should flow through the press easily, which is your signal that the temperature and consistency are just right.
- Add decoration (optional):
- If you're using colored sanding sugar or sprinkles, press them gently onto each cookie right after pressing, while the dough is still sticky enough to hold them. This is the moment the cookies start looking like the ones your guests actually came for.
- Bake until golden at the edges:
- Bake for 7 to 9 minutes—watch for the moment when the very edges turn pale golden and the centers still look barely set. Pull them out at this exact moment; they'll continue to firm up on the hot pan, and they'll stay tender instead of becoming hard.
- Cool and finish:
- Let the cookies rest on the baking sheet for 2 minutes while they set up, then transfer them to a wire rack to cool completely. If you're drizzling chocolate, wait until they're completely cool so the chocolate clings without melting into warm cookies.
 Save
Save There was a holiday party years ago where these cookies sat untouched next to elaborate brownies and frosted sugar cookies, and I felt the familiar pang of the underdog treat. Then someone bit into one, their eyes went quiet for a second, and they reached for three more. That's when I realized that sometimes the simplest things—something that melts on your tongue without any pretense—becomes the one people actually remember and ask about next year.
The Cookie Press Secret
The cookie press is the hero here, but it's also finicky if you don't understand what it wants. The dough has to be soft enough to flow without resistance, but structured enough to hold its shape—it's a narrow window that terrifies new bakers but feels natural once you've done it once or twice. I've learned that filling the press only halfway prevents air pockets from interrupting your designs, and pressing straight down without twisting keeps the shapes clean and recognizable. Think of it as a conversation between your hand and the dough: listen to how easily it flows, and you'll know when everything is right.
Flavor Variations That Work
While the classic vanilla-and-almond version is perfect, I've experimented with swaps that brought different moods to the same recipe. Lemon zest added brightness that felt fresh and springtime, while orange zest created something warmer and more festive. Espresso powder stirred into the dough created little chocolate-tinged cookies that weren't chocolate at all. The beauty of this recipe is its neutrality—it welcomes subtle additions without demanding they be the star, so feel free to taste the dough and adjust the extracts to match what you're craving.
Storage and Keeping These Around
Stored in an airtight container at room temperature, these cookies stay crisp for up to a week, though they've never lasted that long in my kitchen. I've learned that layering them between parchment paper prevents sticking and keeps them from sliding around in their tin, which somehow makes them last longer because I'm not tempted to grab a handful every time I open the container. If they do soften after a few days, a quick 5-minute warm-up in a 300°F oven brings back the crispness and makes them taste freshly baked.
- A tin of these makes a thoughtful gift that says I made something special, just for you.
- The recipe doubles easily if you're facing a crowd or want to give away several tins.
- Make the dough ahead and press everything the day before baking if your schedule demands it.
 Save
Save These cookies are proof that simplicity done right beats complexity every time. Make a batch this week, and I promise someone will ask you for the recipe.
Recipe FAQs
- → What is the best butter temperature for dough?
Use softened butter at room temperature for smooth creaming with sugar, ensuring a tender dough.
- → Can I substitute almond extract?
Yes, lemon or orange zest can replace almond extract for a citrusy twist.
- → How do I prevent cookies from sticking?
Line baking sheets with parchment paper or use a nonstick surface; spacing cookies about an inch apart helps even baking.
- → What decorations work well?
Colored sanding sugar, sprinkles, or melted chocolate drizzle complement the cookies' buttery flavor and festive shapes.
- → How long should cookies cool after baking?
Allow cookies to cool on baking sheets for 2 minutes, then transfer to a wire rack to cool completely for best texture.