 Save
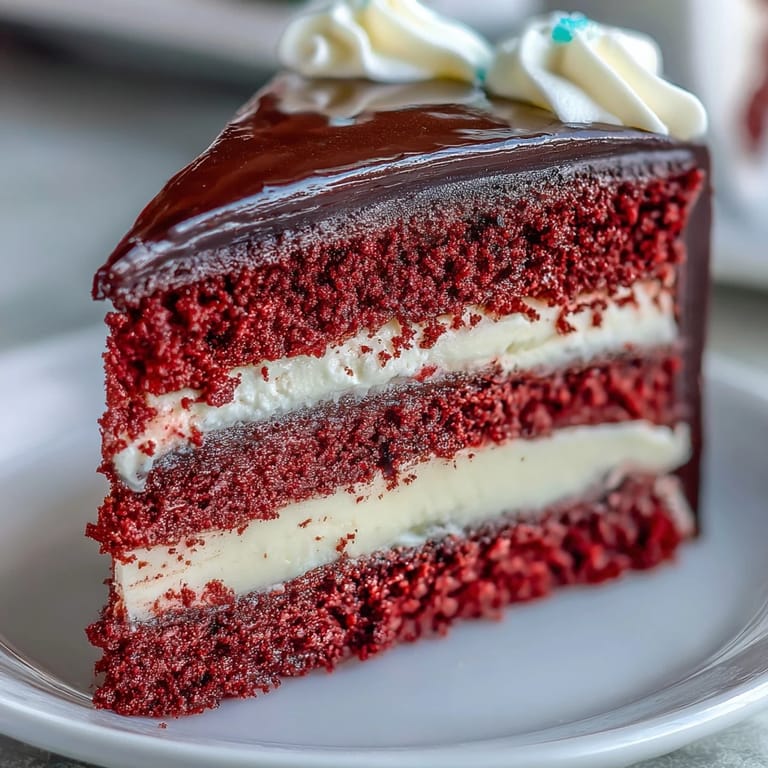
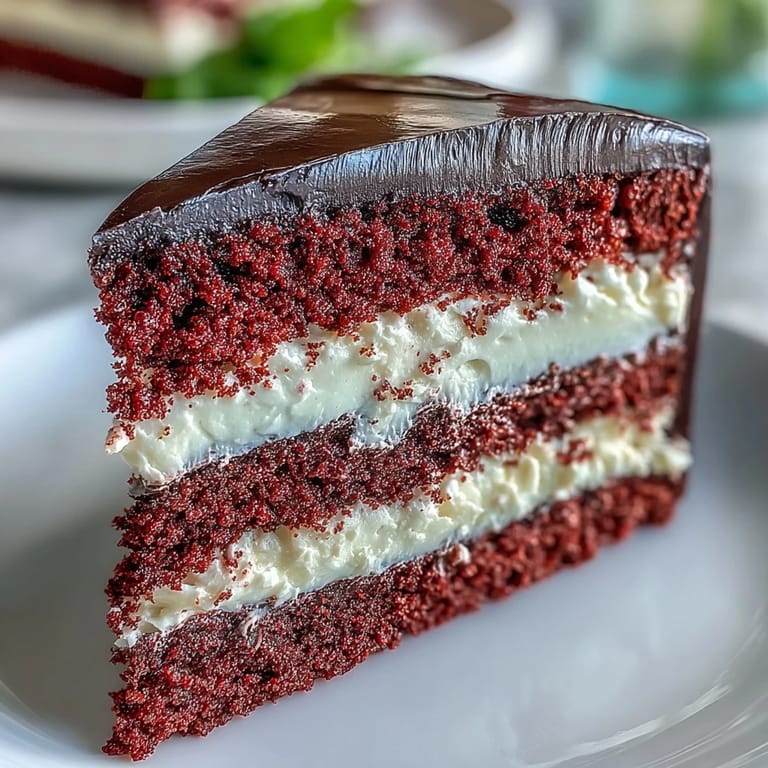
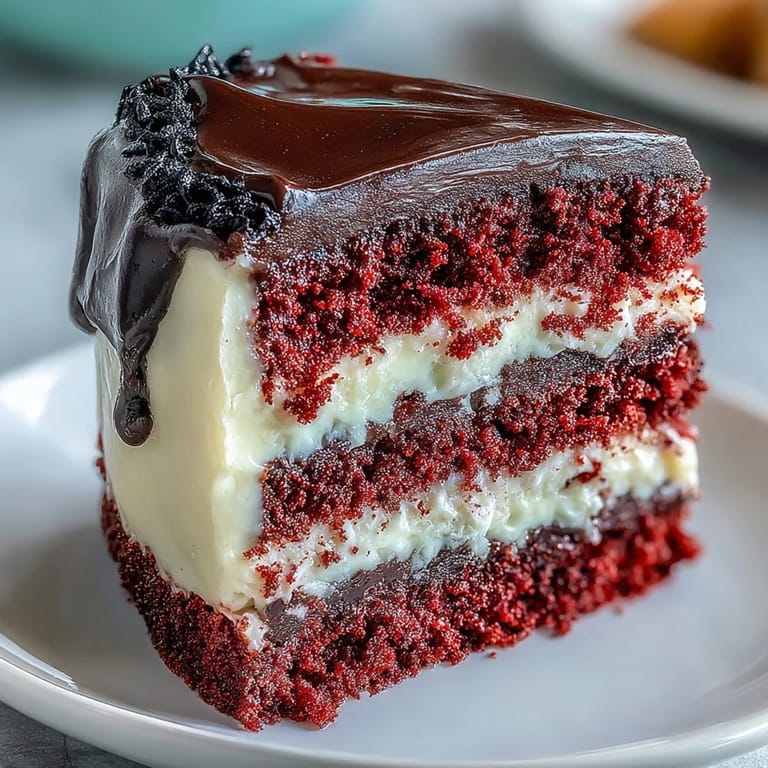
Save My niece squealed when she saw the cartoon face peeking over the frosting edge. I had spent the previous evening nervously rolling black fondant, convinced I'd ruin it, but the moment her eyes lit up made every wobbly cut worthwhile. This Betty Boop cake isn't just dessert; it's a showstopper that turns any celebration into a scene worth remembering. The red velvet base stays moist for days, and the cream cheese buttercream balances the sweetness with just enough tang.
I made this for a friend's birthday party last spring, and guests kept asking if I'd ordered it from a bakery. Watching people pull out their phones to photograph a cake before cutting into it was a new experience for me. The room went quiet when I sliced through the glossy black hair and revealed those vivid red layers underneath. Even the pickiest eaters came back for seconds, scraping their plates clean.
Ingredients
- All-purpose flour (2 cups, 250 g): The backbone of the cake's structure, sifted flour ensures there are no lumps and the crumb stays soft.
- Granulated sugar (1 ½ cups, 300 g): Creaming it with butter creates those tiny air pockets that make the layers light and fluffy.
- Baking powder (2 teaspoons): Fresh baking powder is crucial; old powder means flat, dense cake every time.
- Salt (½ teaspoon): Just enough to amplify the vanilla and balance the sweetness without tasting salty.
- Unsalted butter (½ cup, 115 g, room temperature): Cold butter won't cream properly, so let it sit out for at least an hour before you start.
- Large eggs (2, room temperature): Room temperature eggs blend smoothly into the batter and help the cake rise evenly.
- Whole milk (¾ cup, 180 ml): The fat in whole milk keeps the crumb tender and prevents dryness.
- Vanilla extract (2 teaspoons): Pure vanilla makes a noticeable difference; imitation just doesn't have the same warmth.
- Red gel food coloring (1 tablespoon): Gel gives you that deep, vibrant red without thinning the batter like liquid dye does.
- Cream cheese (8 ounces, 225 g, room temperature): The tanginess cuts through the sugar and makes the frosting irresistible.
- Unsalted butter for buttercream (½ cup, 115 g, room temperature): Beating it with cream cheese creates a silky, pipeable frosting that holds its shape.
- Powdered sugar (4 cups, 500 g, sifted): Sifting prevents gritty frosting and makes the buttercream cloud-like.
- Black fondant (8 ounces, 225 g): Rolling it evenly takes practice, but the dramatic hair silhouette is worth the effort.
- White fondant (4 ounces, 115 g): Perfect for those big, expressive cartoon eyes that give Betty her signature look.
- Red fondant (2 ounces, 55 g): A little goes a long way for those bold lips and optional headband details.
- Edible pearl dust or luster dust (1 teaspoon, optional): A light dusting makes the fondant features shimmer under party lights.
- Cornstarch (for rolling fondant): Keeps fondant from sticking to your work surface without adding grease.
- Cake board: Provides a stable base for assembly and makes transporting the finished cake much easier.
- 8-inch round cake pans (2): Even heat distribution is key, so avoid warped or dark pans that might overbake the edges.
- Parchment paper: Lining the pans guarantees the cakes release cleanly every single time.
Tired of Takeout? 🥡
Get 10 meals you can make faster than delivery arrives. Seriously.
One email. No spam. Unsubscribe anytime.
Instructions
- Prepare the pans:
- Preheat your oven to 350°F (175°C) and line two 8-inch round pans with parchment paper after greasing them lightly. This step prevents any sticking disasters when you try to flip the cakes out later.
- Mix the dry ingredients:
- Whisk together flour, baking powder, and salt in a medium bowl, then set it aside. Whisking now prevents lumps and ensures even distribution of leavening.
- Cream butter and sugar:
- Beat butter and sugar with an electric mixer on medium speed for about 3 minutes until the mixture looks pale and fluffy. This is where you're building the cake's airy texture, so don't rush it.
- Add eggs and vanilla:
- Beat in eggs one at a time, making sure each is fully incorporated before adding the next, then stir in vanilla extract. Room temperature eggs blend more easily and create a smoother batter.
- Alternate wet and dry:
- On low speed, add the flour mixture and milk in three additions, starting and ending with flour, scraping down the bowl as needed. This method keeps the batter tender and prevents overmixing.
- Color the batter:
- Mix in the red gel food coloring until the batter is a uniform, deep red. Gel coloring is concentrated, so add it gradually and check the shade as you go.
- Fill the pans:
- Divide the batter evenly between the prepared pans and smooth the tops with a spatula. Even distribution means both layers bake at the same rate.
- Bake the cakes:
- Bake for 25 to 30 minutes, rotating the pans halfway through, until a toothpick inserted in the center comes out clean. Rotating prevents uneven browning caused by hot spots in your oven.
- Cool completely:
- Let the cakes rest in their pans for 10 minutes, then invert onto wire racks to cool completely. Frosting warm cake will melt your buttercream and create a messy disaster.
- Make the buttercream:
- Beat cream cheese and butter together on medium speed until smooth, about 2 minutes. Gradually add powdered sugar one cup at a time on low speed, then increase to medium and beat for 3 minutes until light and fluffy.
- Level and layer:
- Trim any domed tops with a serrated knife, place one layer on the cake board, and spread buttercream on top. Carefully set the second layer on top, pressing gently to secure it.
- Apply crumb coat:
- Spread a thin layer of buttercream around the entire cake, then chill in the refrigerator for 20 minutes to set. This seals in loose crumbs and makes the final coat much smoother.
- Final frosting:
- Apply a generous final coat of buttercream and smooth the sides and top with a cake scraper or offset spatula. Take your time here; smooth frosting is the canvas for your fondant art.
- Roll black fondant:
- Dust your work surface with cornstarch and roll black fondant to about 1/8-inch thickness, then cut out Betty Boop's hair silhouette using a template or freehand. Transfer it carefully onto parchment to prevent tearing.
- Cut fondant features:
- Roll white fondant and cut out two large circles for eyes and small hearts for highlights, then roll red fondant for lips. Dust with edible pearl dust if you want a subtle shimmer.
- Attach hair silhouette:
- Once the frosting is firm, gently drape the black fondant hair over the front of the cake, trimming any excess at the base. Use a small dab of buttercream to stick the white eyes and red lips in place.
- Add details:
- Use extra black fondant to pipe or cut out eyelashes and eyebrows, positioning them around the eyes. These tiny details bring Betty's face to life.
- Optional headband:
- Roll a thin coil of red fondant into a decorative headband and place it across the top edge of the hair silhouette. This adds an extra pop of color and authenticity.
- Final touches:
- Add any finishing details like a small sugar flower or edible sparkles around the base. Let your creativity guide you here.
- Rest before serving:
- Allow the decorated cake to rest at room temperature for 30 minutes before slicing and serving. This lets the fondant settle and the frosting firm up just enough.
 Save
Save The first time I served this cake, my friend's daughter asked if Betty Boop could stay on the counter forever. We all laughed, but I understood the sentiment. There's something magical about a dessert that doubles as a conversation piece, especially when it tastes as good as it looks. Even days later, people were still talking about the moist red layers and that glossy black hair that seemed almost too perfect to cut.
Making It Your Own
You can easily swap the cream cheese buttercream for Swiss meringue buttercream if you prefer a lighter, silkier finish. I've also added a teaspoon of cocoa powder and a teaspoon of white vinegar to the batter for a classic red velvet flavor, and it worked beautifully. If you want extra stability, insert wooden dowels through both cake layers before applying the final frosting; this trick saved me when I had to transport the cake across town in summer heat.
Preparing Ahead
Fondant decorations can be made a day ahead and stored in an airtight container at room temperature, which takes the pressure off on party day. I've even baked the cake layers the night before, wrapped them tightly in plastic wrap, and refrigerated them until I was ready to assemble. The buttercream also holds well in the fridge for up to three days; just let it come to room temperature and give it a quick whip before using.
Serving Suggestions
This cake is rich enough to stand on its own, but serving it with fresh berries or a dollop of whipped cream adds a refreshing contrast. I've paired it with raspberry coulis at a summer barbecue, and the tartness cut through the sweetness perfectly. For a festive presentation, scatter a few edible flowers around the base or dust the cake board with a light layer of powdered sugar to mimic vintage Hollywood glamour.
- Use a sharp, thin knife dipped in hot water to slice cleanly through the fondant without dragging.
- Store leftover cake in an airtight container at room temperature for up to three days, or refrigerate for up to five.
- If fondant decorations start to sag in warm weather, chill the cake briefly in the fridge to firm everything back up.
 Save
Save Every time I see that playful cartoon face peeking out from under the fondant hair, I'm reminded that baking is as much about joy as it is about flavor. This Betty Boop cake has become my go-to for celebrations where I want to make people smile before they even take a bite.
Recipe FAQs
- → How long does it take to create this Betty Boop cake?
The entire process takes approximately two hours total, including one hour for preparation, thirty minutes for baking, and thirty minutes for resting and chilling. Fondant decorations can be made a day in advance to streamline assembly.
- → Can I make the red layers ahead of time?
Yes, the baked layers cool completely and can be wrapped tightly in plastic wrap. Store at room temperature for up to two days or freeze for up to three months. Thaw frozen layers overnight before frosting and decorating.
- → What makes the cream cheese buttercream different from traditional frosting?
Cream cheese buttercream combines tangy cream cheese with butter and powdered sugar for a rich, slightly tart flavor that perfectly complements the sweet red layers. The texture is creamy and stable, ideal for smooth coating and holding fondant decorations.
- → How do I store the finished creation?
Keep the decorated dessert in a cool, dry place away from direct sunlight for up to two days. For longer storage, refrigerate in an airtight container, though this may soften the fondant slightly. Bring to room temperature for thirty minutes before serving.
- → Can I substitute the fondant decorations?
If fondant seems challenging, use piped buttercream or modeling chocolate for the facial features. These alternatives provide similar visual appeal with different texture and application techniques. Practice your design on parchment before applying directly to the frosted surface.
- → What skill level is required for this project?
This creation rates as advanced due to multiple components including layer baking, crumb coating, smooth frosting application, and detailed fondant work. Experienced bakers comfortable with piping and fondant manipulation will achieve the best results.